我的历史上第一篇教程,Hexo+github搭建个人博客。虽然网上有很多,但是想从这一篇开始我的写作之路。
一些前戏
搭建此博客时,百度了很多资料,但是上手还是从官方资料开始上手
这是官方链接
Hexo
Next主题
图标库
开始使用
前提
Hexo博客的前提需要在本地先安装nodejs与git
推荐一下使用淘宝NPM,本人是windows环境下搭建,建议用git-bash
部署
安装Hexo 1
$ npm install -g hexo-cli
搭建
安装Hexo完成后,请执行以下命令,hexo会在指定文件夹中创建文件1
2
3
4$ cd e:/
$ hexo init <folder>
$ cd <folder>
$ npm install
新建完成后会生成hexo所需要的一些文件
_config.yml
网站的一些主要配置信息都在这文件下进行配置
详细参数可点击链接进行查看
config
Hexo命令
init
1 | $ hexo init [folder] |
新建一个网站。如果没有设置 folder ,Hexo 默认在目前的文件夹建立网站
new
1 | $ hexo new [post|draft|page] <title> |
新建一篇文章。如果没有设置 layout 的话,默认使用 _config.yml 中的 default_layout 参数代替。如果标题包含空格的话,请使用引号括起来。
generate
1 | $ hexo g |
生成静态文件。
server
1 | $ hexo s |
启动服务器。默认情况下,访问网址为: http://localhost:4000/。
deploy
1 | $ hexo d |
部署网站。
clean
1 | $ hexo clean |
清除缓存文件 (db.json) 和已生成的静态文件 (public)。
Hexo美化
主题安装
这里安装的是比较热门的Next主题
里面也有中文文档,安装说明都很详细,具体安装不在本教程说明,但是具体说明主题中的 _config.yml 文件和站点中的 _config.yml 文件配置是有区别之分的,请详细查看清楚具体是配置哪个配置文件。
启用主题
修改站点配置文件 _config.yml 1
2
3
4# Extensions
## Plugins: https://hexo.io/plugins/
## Themes: https://hexo.io/themes/
theme: next
该文章下配置的主题基于2014-2017 https://github.com/iissnan/hexo-theme-next的版本
更多版本请看:https://theme-next.org/
主题设定
选择 Scheme
Scheme 是 NexT 提供的一种特性,借助于 Scheme,NexT 为你提供多种不同的外观。同时,几乎所有的配置都可以 在 Scheme 之间共用。目前 NexT 支持三种 Scheme,他们是:
- Muse - 默认 Scheme,这是 NexT 最初的版本,黑白主调,大量留白
- Mist - Muse 的紧凑版本,整洁有序的单栏外观
- Gemini - 左侧网站信息及目录,块+片段结构布局
Scheme 的切换通过更改 主题配置文件,搜索 scheme 关键字。 你会看到有四行 scheme 的配置,将你需用启用的 scheme 前面注释 # 去除即可。
动态背景
目前NexT主题最新的是V6.0版本,这个版本中可以有4种动态背景:
- Canvas-nest
- three_waves
- canvas_lines
- canvas_sphere
在 _config.yml 文件中即可配置,但是需要下载配置
栗子
点击出现桃心效果
lover.js代码:
1 | !function(e,t,a){function n(){c(".heart{width: 10px;height: 10px;position: fixed;background: #f00;transform: rotate(45deg);-webkit-transform: rotate(45deg);-moz-transform: rotate(45deg);}.heart:after,.heart:before{content: '';width: inherit;height: inherit;background: inherit;border-radius: 50%;-webkit-border-radius: 50%;-moz-border-radius: 50%;position: fixed;}.heart:after{top: -5px;}.heart:before{left: -5px;}"),o(),r()}function r(){for(var e=0;e<d.length;e++)d[e].alpha<=0?(t.body.removeChild(d[e].el),d.splice(e,1)):(d[e].y--,d[e].scale+=.004,d[e].alpha-=.013,d[e].el.style.cssText="left:"+d[e].x+"px;top:"+d[e].y+"px;opacity:"+d[e].alpha+";transform:scale("+d[e].scale+","+d[e].scale+") rotate(45deg);background:"+d[e].color+";z-index:99999");requestAnimationFrame(r)}function o(){var t="function"==typeof e.onclick&&e.onclick;e.onclick=function(e){t&&t(),i(e)}}function i(e){var a=t.createElement("div");a.className="heart",d.push({el:a,x:e.clientX-5,y:e.clientY-5,scale:1,alpha:1,color:s()}),t.body.appendChild(a)}function c(e){var a=t.createElement("style");a.type="text/css";try{a.appendChild(t.createTextNode(e))}catch(t){a.styleSheet.cssText=e}t.getElementsByTagName("head")[0].appendChild(a)}function s(){return"rgb("+~~(255*Math.random())+","+~~(255*Math.random())+","+~~(255*Math.random())+")"}var d=[];e.requestAnimationFrame=function(){return e.requestAnimationFrame||e.webkitRequestAnimationFrame||e.mozRequestAnimationFrame||e.oRequestAnimationFrame||e.msRequestAnimationFrame||function(e){setTimeout(e,1e3/60)}}(),n()}(window,document); |
拷贝所有代码,在/themes/next/source/js/src里面新建love.js,然后在\themes\next\layout\_layout.swig文件末尾添加以下代码:
1 | <!-- 页面点击小红心 --> |
设置网站图标
默认的网站图标是一个N,当然是需要制定一个图了,在网上找到图后,将其放在 /themes/next/source/images 里面,找到主题配置文件中的favicon关键字,进行替换,如图
本地搜索
安装插件:
1 | npm install hexo-generator-searchdb |
配置__config.yml
1 | local_search: |
页面加载进度条
Change dir to NexT directory. There must be layout, source, languages and other directories:
1 | $ cd themes/next |
Install module to source/lib directory:
1 | $ git clone https://github.com/theme-next/theme-next-pace source/lib/pace |
Enable module in NexT _config.yml file and select your theme:
1 | pace: |
And, if you wants to use the CDN, then need to set: (you also need to find your corresponding theme css link in jsdelivr)
1 | vendors: |
Themes list:
- pace-theme-big-counter
- pace-theme-bounce
- pace-theme-barber-shop
- pace-theme-center-atom
- pace-theme-center-circle
- pace-theme-center-radar
- pace-theme-center-simple
- pace-theme-corner-indicator
- pace-theme-fill-left
- pace-theme-flash
- pace-theme-loading-bar
- pace-theme-mac-osx
- pace-theme-minimal
各种进度条样式的预览效果:https://github.hubspot.com/pace/docs/welcome/
文章浏览进度条
Change dir to NexT directory. There must be layout, source, languages and other directories:
1 | $ cd themes/next |
Install module to source/lib directory:
1 | $ git clone https://github.com/theme-next/theme-next-reading-progress source/lib/reading_progress |
Enable module in NexT _config.yml file:
1 | reading_progress: |
And, if you wants to use the CDN, then need to set:
1 | vendors: |
实现统计功能
实现效果图 
具体实现方法
在博客根目录下,git-bash1
$ npm install hexo-wordcount --save
然后在主题的配置文件中,配置如下:1
2
3# Post wordcount display settings
# Dependencies: https://github.com/willin/hexo-wordcount
word_count: true
修改主题 swig 布局
为了能在文章信息处显示字数,我们需要修改 themes/next/layout/_macro/post.swig ,在 class 为 post-meta 的 div 中的添加如下内容:1
2
3
4
5
6
7
8
9
10{% if theme.word_count %}
<span class="post-letters-count">
|
<i class="fa fa-align-right"></i>
<span>字数统计:{{ wordcount(post.content) }}字</span>
|
<i class="fa fa-align-left"></i>
<span>阅读时长:{{ min2read(post.content) }}分</span>
</span>
{% endif %}
修改文章内链接文本样式
修改文件 themes\next\source\css_common\components\post\post.styl ,在末尾添加如下css样式,:1
2
3
4
5
6
7
8
9
10
11// 文章内链接文本样式
.post-body p a{
color: #0593d3;
border-bottom: none;
border-bottom: 1px solid #0593d3;
&:hover {
color: #fc6423;
border-bottom: none;
border-bottom: 1px solid #fc6423;
}
}
其中选择 .post-body 是为了不影响标题,选择 p 是为了不影响首页“阅读全文”的显示样式,颜色可以自己定义。
添加背景
在 theme/next/source/css/_custom 文件夹下打开 custom.styl 文件,往里面添加以下代码:1
2
3
4
5
6
7body {
background:url(图片链接);
background-size:cover;
background-repeat:no-repeat;
background-attachment:fixed;
background-position:center;
}
本地图片将图片放至主题目录下 source\images
打赏功能
找到Next主题下的配置文件中的:
1 | # Reward |
配置文字和对应收款码即可
删除打赏文字闪动样式
进入themes\next\source\css\_common\components\post\post-reward.styl,找到以下样式并删除
1 | #wechat:hover p{ |
修改文章底部的那个带#号的标签
具体实现方法
修改模板 /themes/next/layout/_macro/post.swig ,搜索 rel="tag">#,将#换成 <i class="fa fa-tag"></i>
在网站底部加上访问量
具体实现方法
打开 \themes\next\layout\_partials\footer.swig 文件,在copyright前加上画红线这句话:
1 | <script async src="https://dn-lbstatics.qbox.me/busuanzi/2.3/busuanzi.pure.mini.js"></script> |
然后再合适的位置添加显示统计的代码,如图: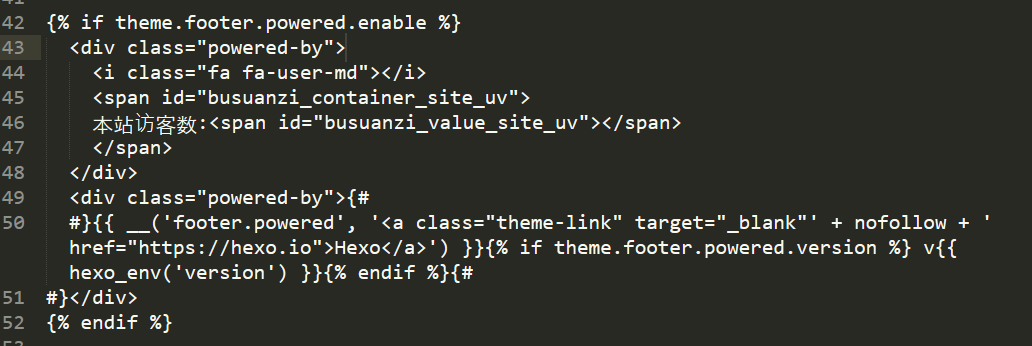
1 | <div class="powered-by"> |
在这里有两中不同计算方式的统计代码:
pv的方式,单个用户连续点击n篇文章,记录n次访问量
1
2
3<span id="busuanzi_container_site_pv">
本站总访问量<span id="busuanzi_value_site_pv"></span>次
</span>uv的方式,单个用户连续点击n篇文章,只记录1次访客数
1
2
3<span id="busuanzi_container_site_uv">
本站总访问量<span id="busuanzi_value_site_uv"></span>次
</span>
文章加密访问
打开 themes\next\layout_partials\head 文件,在以下位置插入这样一段代码: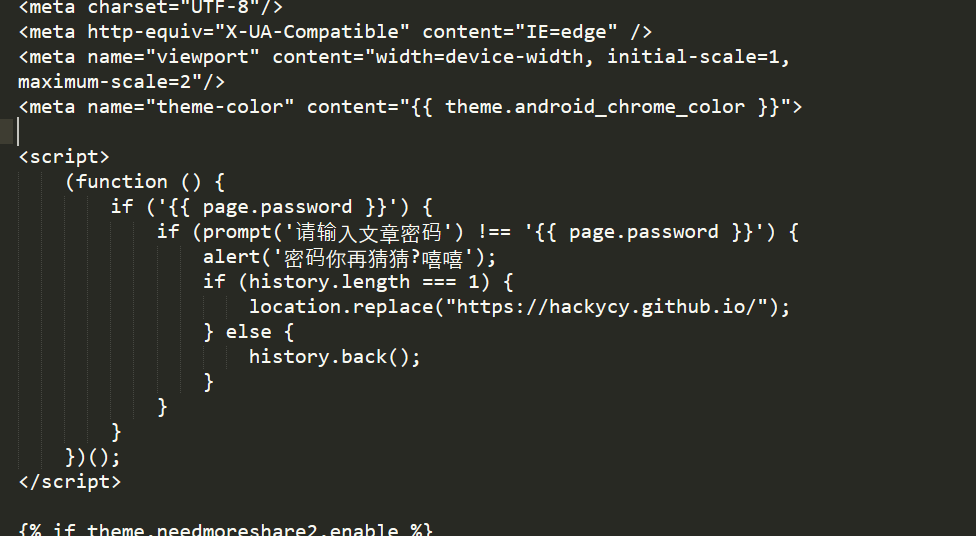
1
2
3
4
5
6
7
8
9
10
11
12
13
14<script>
(function () {
if ('{{ page.password }}') {
if (prompt('请输入文章密码') !== '{{ page.password }}') {
alert('密码错误!');
if (history.length === 1) {
location.replace("http://xxxxxxx.xxx"); // 这里替换成你的首页
} else {
history.back();
}
}
}
})();
</script>
然后在文章上写成类似这样: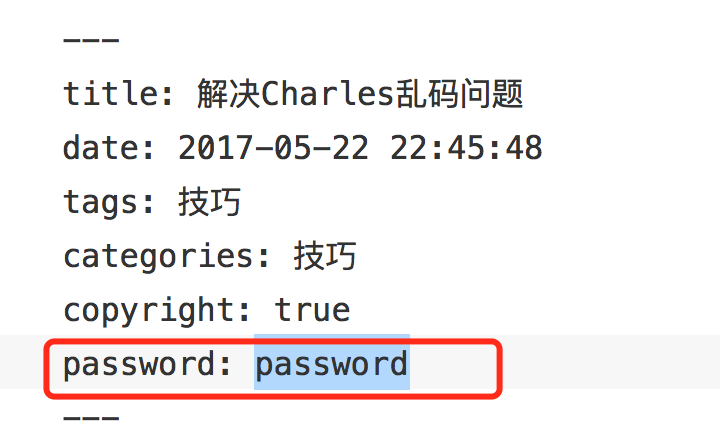
就ok啦,不过很容易被破解掉噢
当然还有另一种方式
guide1
guide2
按照指引就可以啦~
Fancybox3图片浏览
博客上的图片点击浏览功能插件。
如果已经安装了旧版,则先删除
1 | $ rm -rf themes/next/source/lib/fancybox |
然后bash去到themes/next目录
获取插件
1 | $ git clone https://github.com/theme-next/theme-next-fancybox3 source/lib/fancybox |
修改next主题下的_config.yml文件
1 | fancybox: true |
如果想要配置CDN,则再加上
1 | vendors: |
代码块复制
在Next主题配置文件中找到:
1 | codeblock: |
开启即可
部署
首先需要进行创建您个人的github账户
- 创建公钥
打开git-bash,执行1
ssh-keygen -t rsa -C "your_email@youremail.com"
github官方命令 链接
- 直接按三次回车,可不用输入密码,然后打开C盘查找Users/当前用户目录(Administrator),找到.ssh文件夹,打开文件夹下的id_rsa.pub文件,可用记事本文件打开将里面文字全部复制
- 打开github个人主页 (https://github.com/settings/ssh) ,点击 Add SSH Key 按钮,粘贴进去保存即可
安装 hexo-deployer-git。
1
$ npm install hexo-deployer-git --save
创建github仓库

仓库名中填写<github的用户名>.github.io- 修改 _config.yml 文件
1
2
3
4
5deploy:
type: git
repo: <repository url>
branch: [branch]
message: [message]
repository url使用ssh url即可,message不填也可
branch用master分支即可
- 执行
1
$ hexo d
或者1
$ hexo g -d
- 进入博客的github所在仓库,进入仓库设置,查看GitHub Pages
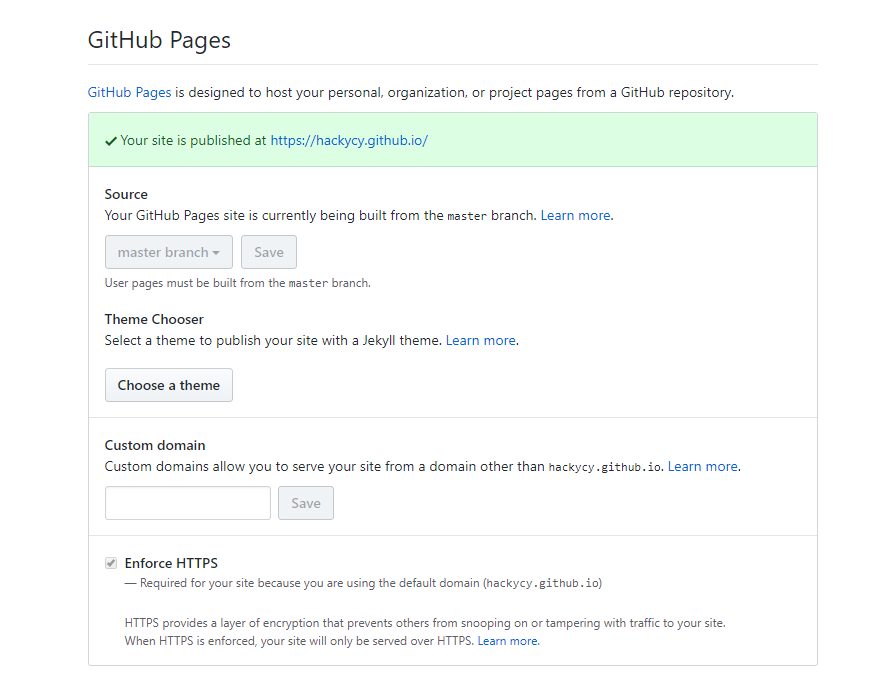
即可完成部署
基本操作
这里只提到一些编写过程中遇到的问题
插入图片
这里涉及到资源文件夹
绝对路径
当Hexo项目中只用到少量图片时,可以将图片统一放在 source/images 文件夹中,通过markdown语法访问它们。1

相对路径
图片除了可以放在统一的 source/images 文件夹中,还可以放在文章自己的目录中。文章的目录可以通过配置 config.yml 来生成。1
post_asset_folder: true
把 _config.yml 中配置post_asset_folder设置为true后,通过命令hexo new <文章名字>,hexo就会在文章的目录下建立一个和文章同名的文件夹,然后把图片资源放进该文件夹下,即可通过1

记住和第一点绝对路径有区别,别在路径前面加/,否则会出错
文档格式
假设我们的文章名为 “hello hexo markdwon”,在命令行键入以下命令即可:
1 | --- |
这些内容是干嘛的呢?事实上,他们就是用于设置 MarkDown 文档在被解析为静态网页文件时的相关配置,这些配置参数一般位于文件中最上方以 — 分隔的区域。
其中,title 的值是当前文档名,也是将来在网页中显示的文章标题。
date 值是我们新建文档时的当地时区时间。
tags 值是文档的标签,我们可以随意赋值为文档贴标签。其用法如下:1
2
3
4
5
6
7
8---
title: hello hexo markdown
date: 2016-11-16 18:11:25
tags:
- hello
- hexo
- markdown
---
文章分类
categories 是用来给文章分类的,它跟 tags 不同的是其具有顺序性和层次性。
categories 的用法同 tags 一样,只不过斗个 categories 值是分先后顺序的。
1 | categories: |
文章摘要
有的时候,主题模板配置的不够好的话,Hexo 最终生成的静态站点是不会自动生成文章摘要的。
所以,为了保险起见,我们也自己手动设置文章摘要,这样也方便避免自动生成的摘要不优雅的情况。
设置文章摘要,我们只需在想显示为摘要的内容之后添 <!-- more --> 即可。像下面这样:1
2
3
4
5
6
7
8
9
10
11---
title: hello hexo markdown
date: 2016-11-16 18:11:25
tags:
- hello
- hexo
- markdown
---
我是短小精悍的文章摘要(๑•̀ㅂ•́)و✧
<!-- more -->
紧接着文章摘要的正文内容
这样, <!-- more --> 之前、文档配置参数之后中的内容便会被渲染为站点中的文章摘要。
注意!文章摘要在文章详情页是正文中最前面的内容。
Hexo内置标签
Note提示块
default 提示块标签
primary 提示块标签
success 提示块标签
info 提示块标签
warning 提示块标签
danger 提示块标签
使用方法:
1 | {% note default %} |
Next主题配置文件可以修改风格:
1 | # Note tag (bs-callout). |
Tab标签
tab 标签用于快速创建 tab 选项卡,语法如下
1 | {% tabs [Unique name], [index] %} |
其中,各参数意义如下:
- Unique name: 全局唯一的 Tab 名称,将作为各个标签页的 id 属性前缀
- index: 当前激活的标签页索引,如果未定义则默认选中显示第一个标签页,如果设为 - 1 则默认隐藏所有标签页
- Tab caption: 当前标签页的标题,如果不指定则会以 Unique name 加上索引作为标题
- icon: 在标签页标题中添加 Font awesome 图标
使用示例如下:
1 | {% tabs Tab标签列表 %} |
标签页1文本内容
标签页2文本内容
标签页3文本内容
Next主题配置查看
1 | # Tabs tag. |
Label标签
通过 label 标签可以为文字添加背景色,语法如下:
1 | {% label [class]@text %} |
支持的 class 种类包括 default primary success info warning danger,默认使用 default 作为缺省。
使用示例如下:
1 | I heard the echo, {% label default@from the valleys and the heart %} |
I heard the echo, from the valleys and the heart
Open to the lonely soul of sickle harvesting
Repeat outrightly, but also repeat the well-being of
Eventually swaying in the desert oasis
I believe I am
Born as the bright summer flowers
Do not withered undefeated fiery demon rule
Heart rate and breathing to bear the load of the cumbersome
Bored
可在主题配置文件中设置 label: false 来取消 label 标签默认 CSS 样式。
Button按钮
通过 button 标签可以快速添加带有主题样式的按钮,语法如下:
1 | {% button /path/to/url/, text, icon [class], title %} |
也可简写为:
1 | {% btn /path/to/url/, text, icon [class], title %} |
其中, 图标 ID 来源于 FontAwesome 。
使用示例如下:
1 | {% btn #, 文本 %} |
文本 文本 & 标题 文本 & 图标 文本 & 大图标 (固定宽度)
引用站内链接
可以通过如下语法引入站内文章的地址或链接:
1 | {% post_path slug %} |
其中,slug 表示 _post 目录下的 Markdown 文件名。
post_path 标签将会渲染为文章的地址,即 permalink;而 post_link 标签将会渲染为链接,可以通过 title 指定链接标题。
如以下标签将会生成 /posts/hexo-github-搭建个人博客.html
1 | {% post_path hexo-github-搭建个人博客 %} |
而以下标签则会生成/2018/09/07/hexo-github-搭建个人博客/
1 | {% post_link hexo-github-搭建个人博客 链接标题 %} |
这种站内引用方式比直接使用 url 引用的形式更为可靠,因为即使修改了 permalink 格式,或者修改了文章的路由地址,只要 Markdown 文件名没有发生改变,引用链接都不会失效。